Creating Deployment Slots – PaaS Compute Options
- Home Certification of Microsoft AZ-104
- Creating Deployment Slots – PaaS Compute Options


Creating Deployment Slots – PaaS Compute Options
You can create new deployment slots with an empty or cloned configuration. There are certain properties that can be swapped, and some of them cannot be swapped during the swap process. The following list gives you an idea about which settings can and cannot be swapped:
These are settings that are swapped:
- General settings including the framework version
- App settings
- Connection strings
- Handler mappings
- Public certificates
- WebJobs content
- Hybrid connections
- Service endpoints
- Azure CDN
These are settings that are not swapped:
- Publishing endpoints
- Custom domain names
- Nonpublic certificates
- Scale settings
- IP restrictions
- Diagnostic settings
- Always-on configuration
- CORS
- Virtual network integration
- Managed identities
Microsoft is planning to remove some entries from the settings that are swapped, so it’s a best practice to review the following document to get the updated list of settings:
https://docs.microsoft.com/en-us/azure/app-service/deploy-staging-slots
Deployment slots can be created by navigating to the Deployment Slots blade of your App Service. As shown in Figure 9.3, you will be able to create a new slot by clicking the Add Slot button. You can give a name for the slot; for example, if you name the slot ax0f45-dev, then this slot name will be appended to the App Service name in the azurewebsites.net domain. In our case, it will be ax0f45-ax0f45-dev.azurewebsites.net, where ax0f45 is the name of the App Service and ax0f45-dev is the name of the slot.
In Figure 9.3, you can see that you have an option to clone the settings or start from scratch. Once you click Add, the slot will be created. This slot can be treated as an individual app and will be consuming resources from our App Service plan. If you are planning to add more slots, make sure that you have enough resources in the plan to accommodate these slots. Otherwise, due to a lack of resources, your production slot will be affected. Let’s see how you can swap the slots in the App Service.
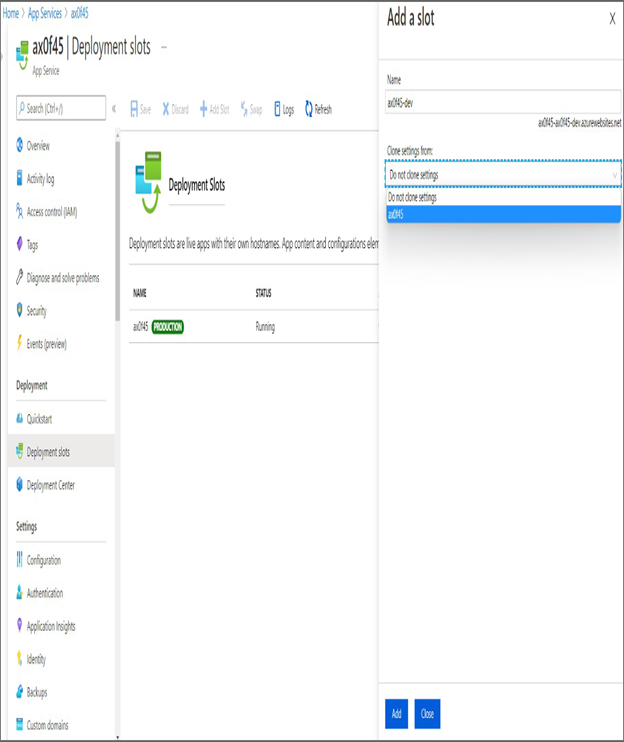
FIGURE 9.3 Adding a deployment slot
Swapping Deployment Slots
After creating the slot, if you navigate back to the Deployment Slots blade, you will be able to see the production slot and the staging slot. If you notice in Figure 9.4, you can also control the amount of traffic that can be sent to each slot. In this case, you have set the traffic 50 percent; that means 50 percent of the users will hit the production slot, and the remaining 50 percent will be going to the staging slot. This is ideal if you would like to send a portion of your customers to the new app to evaluate the new features and share feedback. All the load balancing will be handled by the App Service, and you don’t have to create any additional load balancers. If you don’t want your users to access the staging slot, you can route 100 percent of the traffic to the production slot.
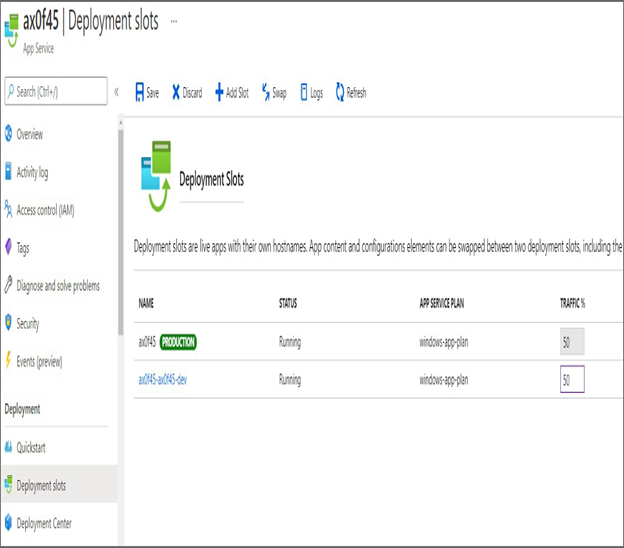
FIGURE 9.4 Identifying deployment slots
In Figure 9.4, you can see that there is an option to swap the slots. Clicking the Swap button will take you to the swap pane. As you can see in Figure 9.5, you will be asked to provide the source and destination slots. The portal is intuitive and will show us the configuration changes that will happen during the swap process. Clicking Swap will swap the slots.
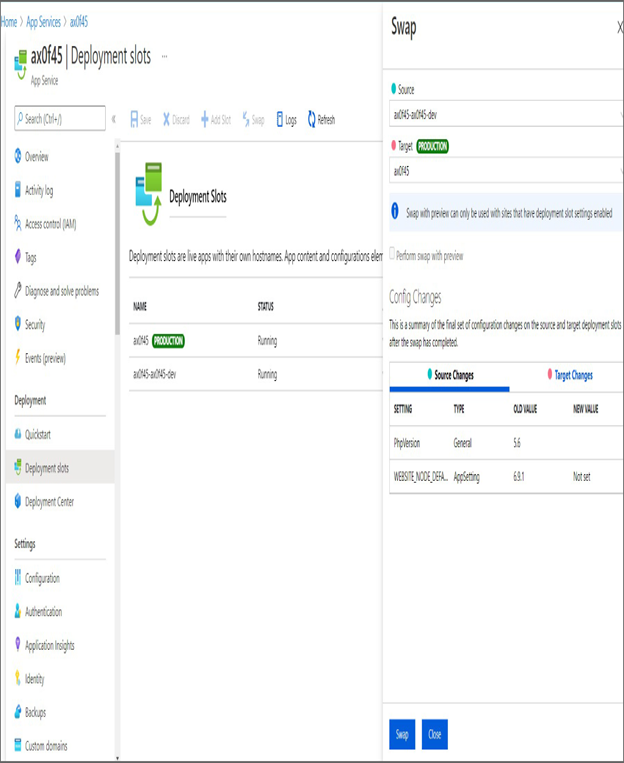
FIGURE 9.5 Swapping deployment slots
Once the swap is completed, the code that was in the staging slot will be moved to the production slot. Any user accessing the web app using the URL will be using the new code. The previous production code will be moved to the staging slot, and you can still access this code by going to the URL of the slot. In this case, you have not made any code changes to your application, so the swap will make no difference to your application. However, in real-world scenarios, the deployment slot can be used to push the code in the staging environment to the production environment without any downtime.Now that you know how to handle code in the slots, let’s see how you can secure your application by integrating with an authentication provider.