Securing App Service – PaaS Compute Options
- Home Certification of Microsoft AZ-104
- Securing App Service – PaaS Compute Options


Securing App Service – PaaS Compute Options
If you are deploying your application to a virtual machine, you need to write code to integrate with an authentication provider. For example, let’s say you want your end users to sign in using Facebook and Google. This requires you to write code for integrating this authentication provider by exporting the necessary libraries and plugins. In the case of an App Service, it has a built-in authentication and authorization support. You can integrate supported authentication providers without adding any code to your application. The following are the options supported in Azure App Service:
- Allow anonymous requests: This is the default action, and users will be able to access your application without supplying any credentials. For accessing the APIs, you don’t need to provide any information in the HTTP headers as the app supports anonymous access.
- Allow only authenticated requests: This option is used when you are adding an identity provider to your application. All users need to complete the authentication to access the app.
Adding Identity Provider
As mentioned, if you would like to enable authentication support for your application, then you need to add an identity provider. This can be achieved by navigating to the Authentication blade of your App Service (refer to Figure 9.6). Supported providers include Microsoft, Facebook, Google, OpenID Connect, and Twitter.
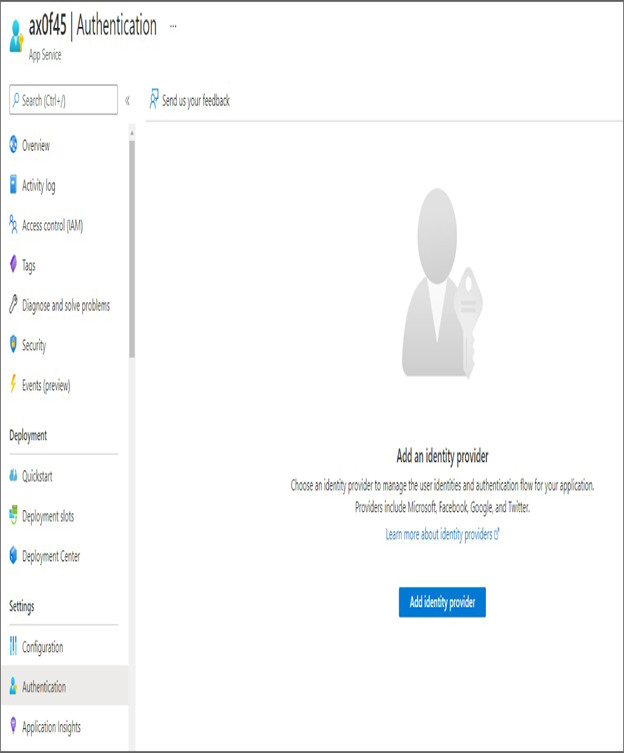
FIGURE 9.6 Adding an identity provider
Clicking Add Identity Provider will let you choose from the supported providers. Choosing Microsoft requires you to create a service principal in Azure AD; this will be used for authentication purposes. For other platforms, you need to create service accounts in the respective developer portal and update the App Service with the client ID and client secret.
For easier demonstration, you can choose Microsoft and integrate Azure AD sign-in to your application. Selecting Microsoft will take you to the app registration poral where you need to specify the account types and name of the app registration that will be created in Azure AD (refer to Figure 9.7).

FIGURE 9.7 Adding Azure AD authentication
You can go with the default configuration and add the identity provider. Now, if you navigate to the browser and try to access your application, it will request you to sign in using your Azure AD credentials, as shown in Figure 9.8.
Since you have selected a single tenant as the account type, only the users from this tenant will be able to access the application. In this scenario, you restricted the access to the entire application, which might not be the case for all applications. There will be cases where you need to show the home page and then authenticate access to certain paths. This can also be accomplished.
The authentication and authorization module in App Service is responsible for the following actions:
- Authenticates users with the selected identity providers
- Validates, stores, and refreshes the tokens
- Manages the authenticated session
- Injects identity information to all HTTP request headers
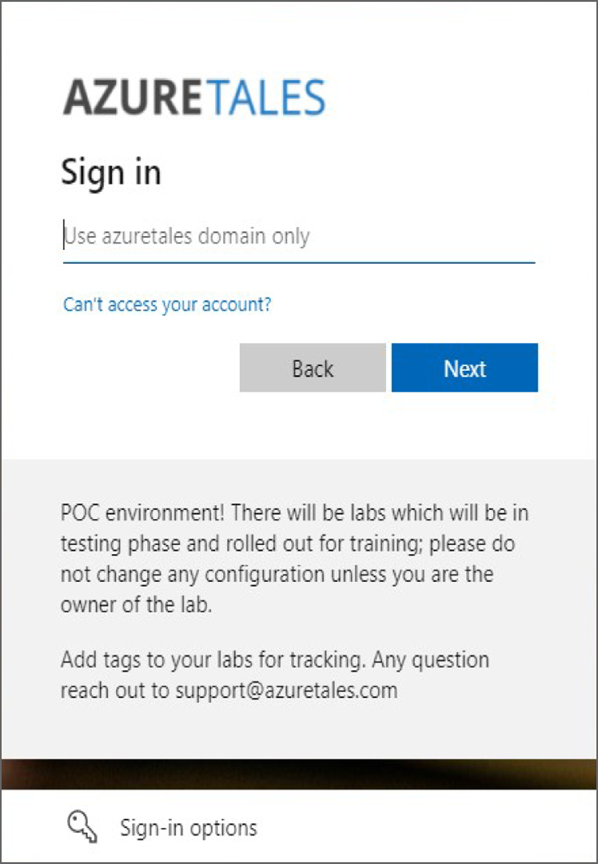
FIGURE 9.8 Verifying Azure AD authentication
You can enable application logging and get insights into the authentication and authorization traces. This will be helpful in analyzing issues related to authentication errors. We talk more about monitoring in Chapter 8, “Automation, Deployment, and Configuration of Resources.” As of now, our application is created with a URL that is under the azurewebsites.net domain; to add the branding, you need to use your own domain. Let’s see how you can add custom domains to your application.